The country's brightest football prospects are in action today at Hancock Whitney Stadium for the 73rd Senior Bowl, a fixture that's been illuminated by the likes of Dan Marino, Dak Prescott and Justin Herbert, and produced more than 50 Pro Football Hall of Famers over the years. The draft starts in Mobile! Read on as we explain how to get a 2022 Senior Bowl live stream and watch the college football all-star game online no matter where you are in the world.
Robert Saleh and the New York Jets coaching staff have been working with the National Team all week, while Dan Campbell and the Detroit Lions top brass have been getting up close and personal with the American Team.
Former Liberty signal-caller Malik Willis (American Team) has been generating a lot of buzz, but it's Pittsburgh center and Heisman Trophy finalist Kenny Pickett (National Team) who's been spoken of as a potential first QB pick in the April draft.
Of course, it's not all about QBs, and one of the most entertaining subplots of the week has been the battle between edge rusher Jermaine Johnson and offensive lineman Darian Kinnard. The full Senior Bowl rosters are listed below. Follow our guide on how to watch a 2022 Senior Bowl live stream wherever you are in the world.
How to watch Senior Bowl 2022 from outside your country
If you've mismatched a holiday or you're away on business and you want to watch your country's coverage from abroad, then you'll need to use a VPN . This will help you dial in to a location back in your home country to avoid geo-blocks and regain access to the content and services you already pay for back home.
A VPN is generally perfect for this as it allows you to change your IP address so you appear to be in a completely different location when the big game is on.
Use a VPN to live stream Senior Bowl from anywhere

2022 Senior Bowl live stream: how to watch college football in the US
2022 Senior Bowl rosters
National Team roster (New York Jets)
American Team Roster (Detroit Lions)

Which cameras work best with Adobe's Super Resolution mode?
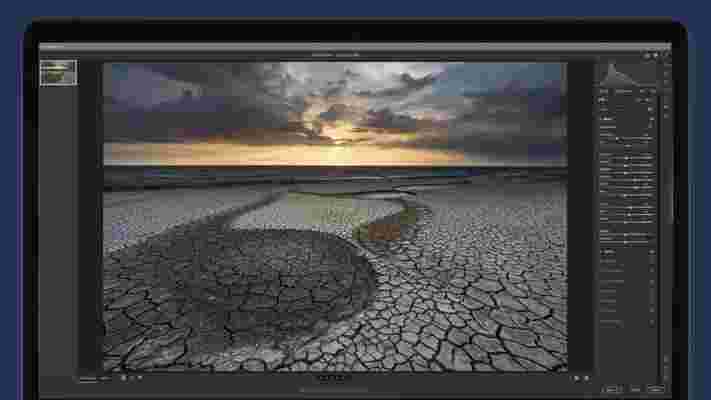
This time last year, Adobe's Super Resolution feature arrived to intelligently upsize our photos in Camera Raw and Photoshop. It's a useful tool for creating large prints or boosting the size of old raw files, but results can vary depending on the camera you've used to take the shot.
While 60MP is now the higher end of the megapixel scale for full-frame cameras, not all modern cameras have such a high pixel count – and the older raw files you have in your catalogue will inevitably have lower resolutions. So which images does Super Resolution produce the best results with?
We tested shots from three different cameras – a Canon EOS 5D, Fujifilm X100V and Sony A7R III – to find out, and the results are below. If you're new to Super Resolution, you can find it in Adobe Camera Raw 13.2, Photoshop and Lightroom, but we've also included a step-by-step guide to using it with your photos below.
Super Resolution simply provides a a way of doubling the resolution of images; the height and width of a raw file, JPEG or TIFF are doubled to provide four times the original resolution, while a new DNG file is created for you to edit and export for your desired output. Here's how it works with different cameras, and how to use it on your photos, too.
The tests
Canon EOS 5D Raw files produced an excellent result which appears ever so slightly less sharp than the original image file with the same amount of sharpening applied.
Increasing the level of sharpening of the enlarged DNG from the default amount of 40 to 65 produces a practically identical result.
Raw files from the Fujifilm X100V performed in an almost identical way to those from the low-resolution Canon EOS 5D.
The enlarged DNG was slightly softer than the original and increasing the amount of sharpening to 65 brought the sharpness of the new file up to the same level of overall sharpness.
The Sony A7R III produced the least impressive result with a slightly over-sharpened look to details when set to the default amount of sharpening.
There were also small but noticeable artifacts creeping in along sharp edges when viewed at 100%. Zooming out to 66.7% resulted in this apparent over-sharpening becoming less obvious, and reducing sharpening to 20 does help, but the artifacts remain.
The verdict
It appears that Super Resolution is more effective with raw files that are below 30MP, with the raw files created by higher resolution cameras such as the Sony A7R III appearing over-sharpened.
Still, the results from higher-resolution cameras remain perfectly usable, and in print, which is the only reason you would need to enlarge any image, this apparent over-sharpening wouldn’t be visible.
Overall, Super Resolution in both Adobe Camera Raw and Lightroom provides a great way to interpolate images to be able to make larger prints. It’s a fantastic feature, because it’s easy to use and means that if you’re using a camera with a medium resolution of around 24MP, or enlarging raw files from older cameras, you can do so knowing that results will be generally excellent.
The results from enlarging JPEGs and TIFFs aren’t quite as good as using raw files, but this comes as little surprise. If you only shoot in JPEG, you can certainly still use Super Resolution and will need to increase sharpening in the resulting DNG, but the details lack the overall clarity you can maintain with raw files.
How to use Super Resolution
Below we'll cover the application of Super Resolution in Adobe Camera Raw (ACR), but will mention any differences in the process using Lightroom. When enlarging JPEGs and TIFFs in Lightroom, the process is the same as for raw files, but for ACR it’s slightly different.
To open JPEGs or TIFFs into ACR, go to Edit>Preferences>Camera Raw and in the File Handling tab, then set JPEG or TIFF to Automatically open all supported JPEGs or TIFFs. Just remember to change the settings back so that these files open normally in Photoshop once finished.
1. Open your image and edit
To use Super Resolution in Adobe Camera Raw, open the image using Bridge or by selecting File>Open in Photoshop and selecting the desired raw file which will open in the Camera Raw dialogue window by default.
If you’ve set your computer to open Raw files in Photoshop when double-clicked, this will work too. For Lightroom, simply left mouse click on the desired thumbnail in the Develop module. Edit the image as desired as these settings will be loaded into the DNG.
2. Apply Super Resolution
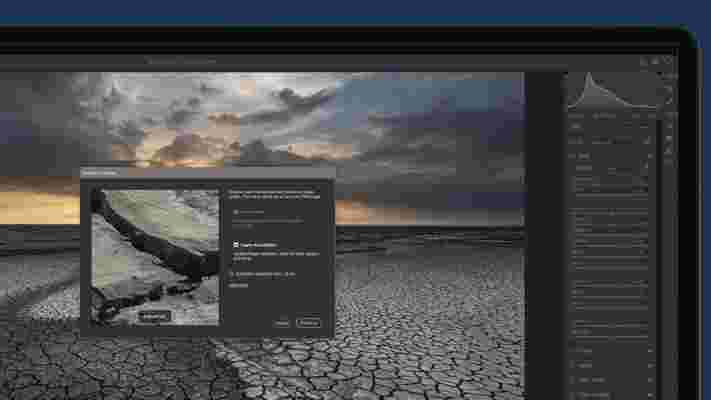
Once an image is edited in ACR or Lightroom, right mouse click on the main image window and select Enhance. When the dialogue box opens, click on the Super Resolution check box and then click on the Enhance button.
In Lightroom, you can choose to stack the new DNG with the original or leave the box unchecked so it appears as a separate image. In ACR, the new DNG can be found in the source folder and it will appear as a new thumbnail in the ACR dialogue window.
3. Open in Photoshop, edit and save
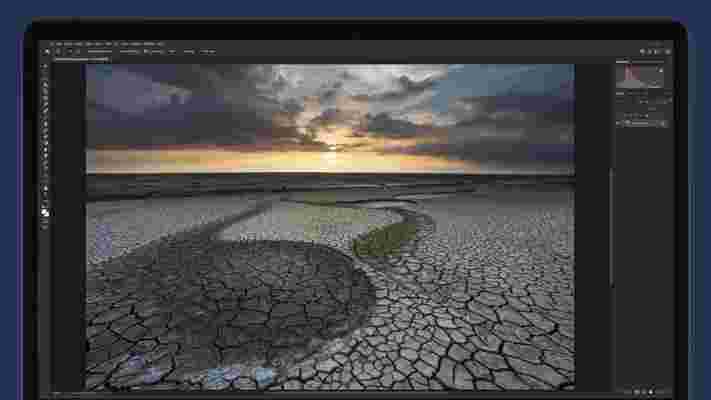
If using Lightroom you can simply Export the edited enlarged image to the desired image format and edit further in Photoshop if required. If using ACR, set your output settings by clicking on the image details at the bottom of the interface.
Then click on the Open button to open the image in Photoshop and save it in the desired file format. At this stage, you can apply any further editing required in Photoshop such as Adjustment Layers, cloning and other effects.
Check out the video below for a closer look at Adobe's Super Resolution mode in action.
The love for open source software is showing no signs of slowing down
The love for open source software is spread across the whole technology spectrum, a new report looking at the state of developing software and the tools needed to do so has claimed.
The 2022 State of Open Source Report , conducted by OpenLogic, surveyed 2,660 professionals and their organisations that use open source tools.
If you are a software developer or work in an adjacent industry then this is probably no surprise: open source tools are the glue that holds so many things together, a community of selfless individuals working towards a bigger goal.
Open source love
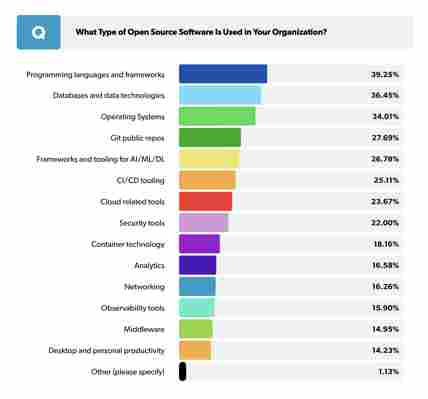
The report asked respondents a series of questions to gauge their interest (and love) for open source, covering a wide variety of roles and companies (see below for more on the specific methodologies).
Most respondents use an open source programming language or framework, closely followed by databases, OSes, Git repos, frameworks for AI/ML/DL, and the cloud.
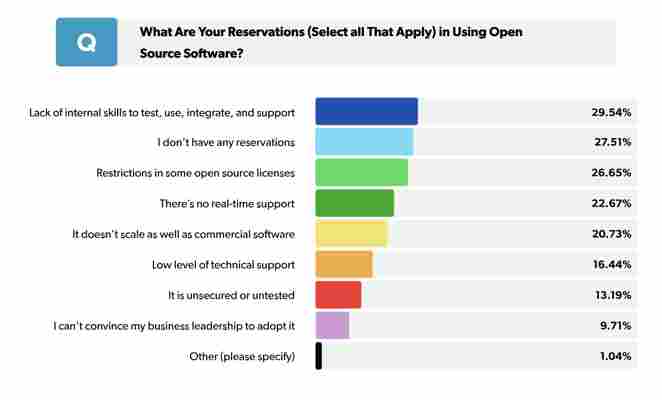
When it comes to reservations, respondents highlighted a lack of skills. But, perhaps most interestingly, a full 27% said they had no reservations at all.
When it came to reasons for using open source, the answers were clear: access to innovations and latest technologies; no license cost, meaning an overall cost reduction; modernising their technology stack; many options for similar technologies; and constant releases and patches.
Methodology
Most (38%) are technology companies, but lots of other sectors are represented: consulting, banking and finance, transport, telecoms, education, healthcare, public sector, and so on. 39% of companies were between 100 and 1,000 employees, 32% were under 100 employees, and 28% were over 1,000 employees.
In terms of the regions, North America dominated, representing 52.6% of respondents, followed by Asia Pacific (12.4%), UK and Europe (10.9%), Asia (7.7%), Middle East (6.6%), Latin America (5.2%), Africa (4.2%), and Oceania (0.32%).
Full Stack Developers were the highest respondents, representing 21.8%, followed by Back End (18.5%), Front End (16%), Engineering (15.7%), Project Management (14.4%), Architect (14.4%), DevOps (12.6%), and so on.